How to grant permissions over ADB
Whether you're new to ADB or looking for a clear, step-by-step process, this guide has you covered. Let's dive in!

On this page
In this guide, we will cover up the most common and easy way for granting permissions over ADB ( Android debug bridge). It will be long but it's because it includes detailed information and also screenshots so you can understand it better. This example can be used with any other application, everything is the same except the package name. In this case, we'll use the Battery Guru app and platform tools for Windows.
📝 Requirements#
- PC
- Platform Tools
- USB Cable
- Android device
⚙️ Setup#
Step 1: Setting up platform tools#
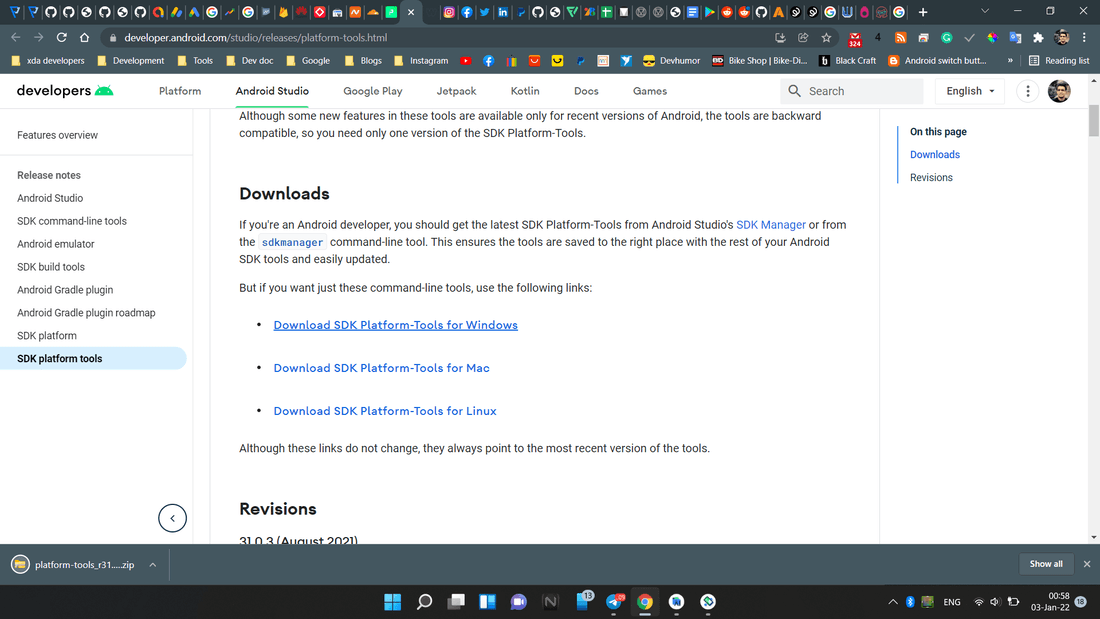
Download platform tools for your platform (Windows, Linux, or Mac) from the official Android developer site. Android SDK Platform-Tools is a component for the Android SDK. It includes tools that interface with the Android platform, such as adb, fastboot, and systrace.
These tools are required for Android app development. They're also needed if you want to unlock your device bootloader and flash it with a new system image. Although some new features in these tools are available for recent versions of Android, the tools are backward compatible, so you need version of the SDK Platform-Tools.
Download: Platform Tools
Step 2: Extract platform tools#
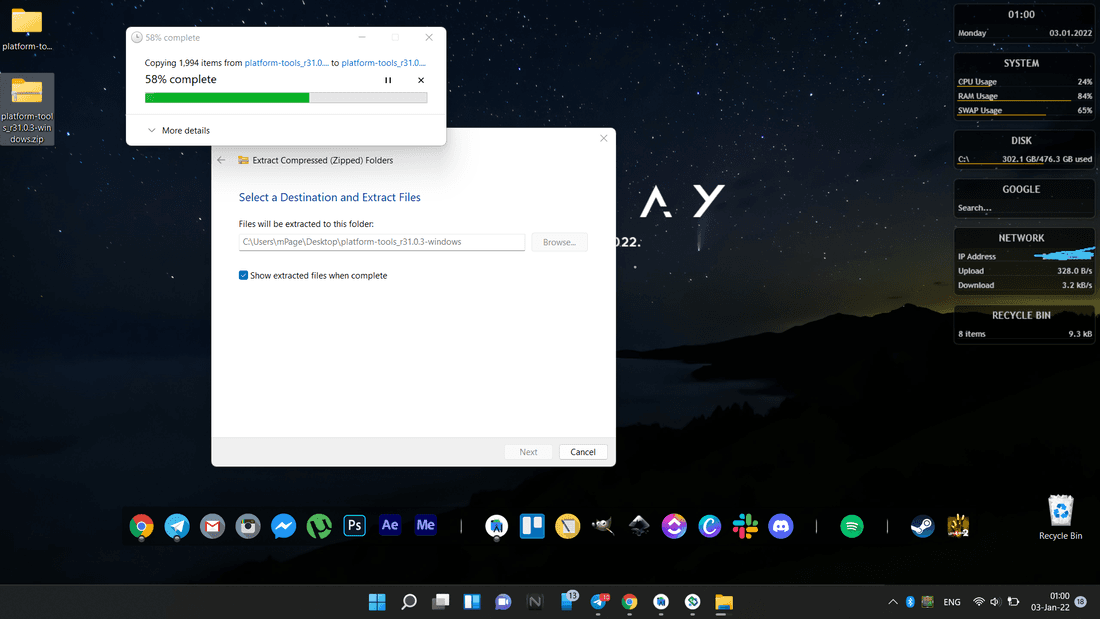
After downloading platform tools for your platform (Windows, Linux, or Mac), you are ready to extract the ZIP file. While doing this we need to prepare our Android device for the USB Debugging to connect it with ADB and grant necessary permissions.
Step 3: Setting up the Android device#
For this part of the guide, you need to perform several steps on your Android device. Steps with screenshots will be posted below. Every screenshot represents step. In this example, I'm using a Xiaomi device with MIUI, but steps are similar with any other OS (OneUI, AOSP, OxygenOS, HyperOS...)
Steps to be done on your phone:
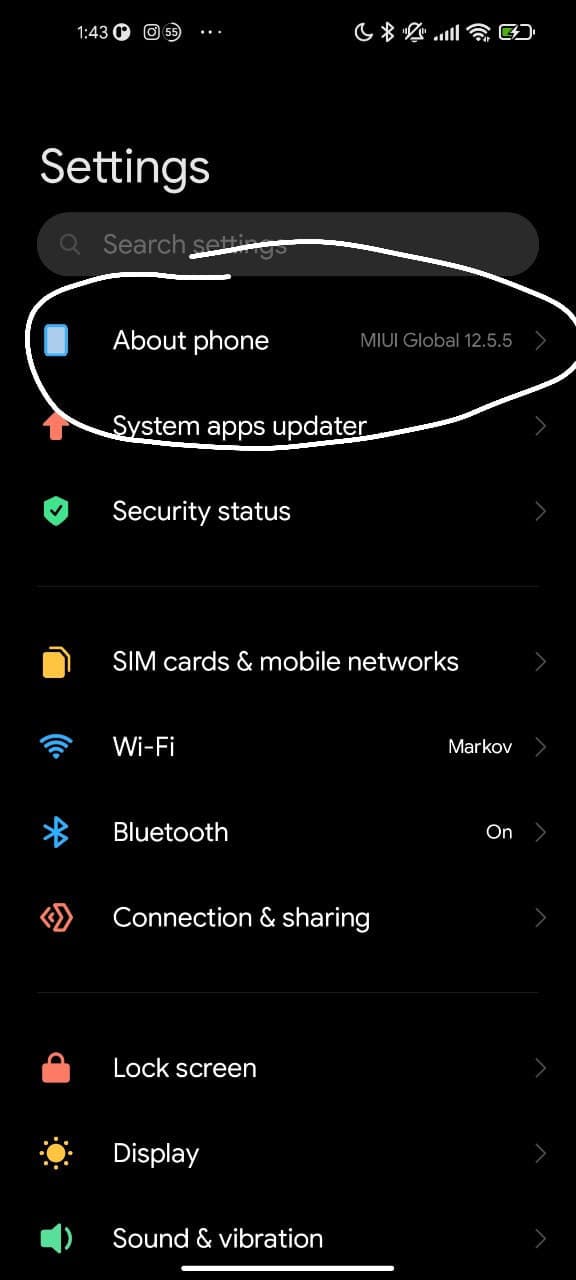
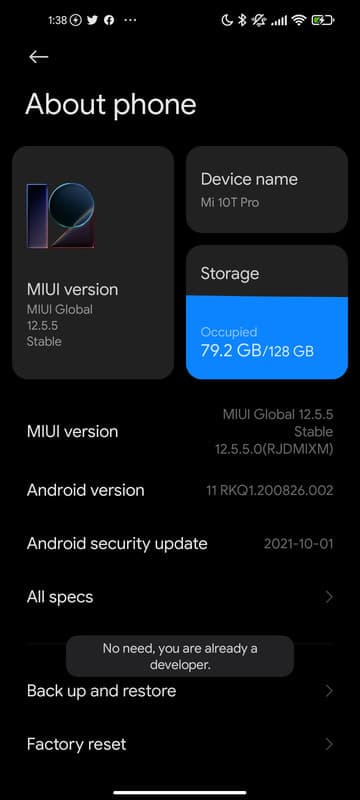
1. Locate device about section
Open your device’s settings menu and navigate to the "About Phone" or "About Device" section. On most Android devices, this option is typically located at the bottom of the settings list, but its exact location may vary depending on the device manufacturer or software version. If you're unable to find it directly, you can use the search bar within the settings menu and type "About." This section contains important information about your device, including its model number, software version, and other technical details. Proceed here to enable Developer Options, which is a prerequisite for granting permissions via ADB.
2. Enable Developer options
In the "About Phone" or "About Device" section, locate the "Build Number" entry. On some devices, this may be under a sub-menu like "Software Information." Tap on the "Build Number" option seven times consecutively. As you do this, you should see a message appear on the screen indicating your progress, such as "You are now X steps away from being a developer." you've tapped enough times, a confirmation message will appear, stating something like "You are now a developer." This process unlocks the Developer Options menu, which is essential for enabling USB debugging and using ADB commands.
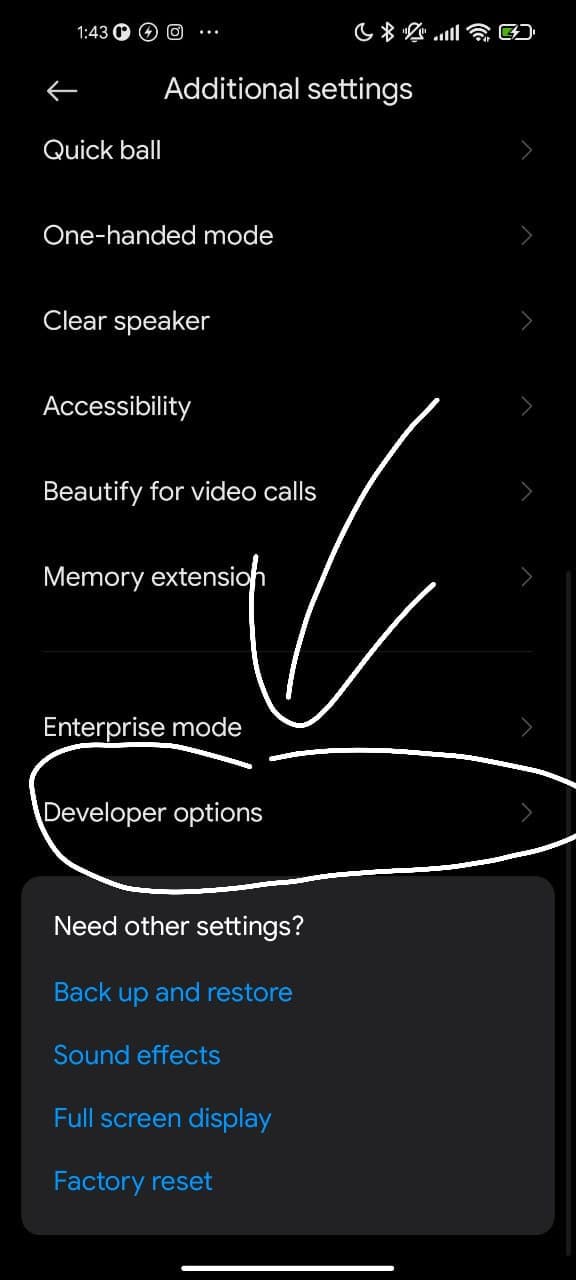
3. Locate Developer options
After unlocking Developer Options, go back to the main settings menu. Look for the newly added "Developer Options" section, which is typically located near the bottom of the settings list or within a sub-menu like "System" or "Advanced Settings," depending on your device and Android version. If you’re having trouble locating it, use the search bar in the settings menu and type "Developer Options." found, tap on it to access various advanced settings and enable features like USB debugging, which is required for granting permissions via ADB.
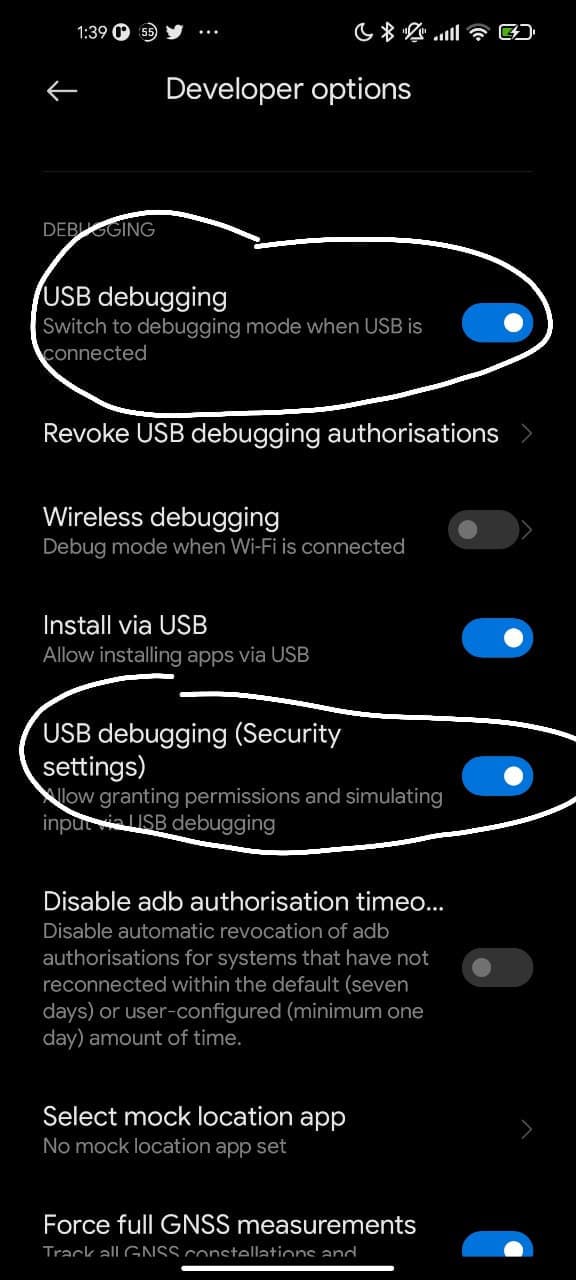
4. Enable needed functions
In the Developer Options menu, scroll down to find the "USB Debugging" setting, which is usually located under the "Debugging" section. Tap the toggle next to "USB Debugging" to enable it, and confirm your choice when prompted. On some devices, you may also see an additional option labeled "USB Debugging (Security Settings)" or something similar. If this option is available, enable it as well to allow advanced debugging features, which may be required for certain ADB commands. These settings ensure that your Android device can communicate with the connected PC for executing ADB commands effectively.
5. Final steps
Finally, connect your device to your computer using a USB cable if you haven’t already done so. When the connection is established, a popup will appear on your Android device asking you to allow USB debugging access for this specific computer. Review the message and tap "Allow" to grant the necessary permissions. For added convenience, you can check the option "Always allow from this computer" to avoid repeated prompts in the future. On some devices, you might encounter issues while granting ADB permissions. If this happens, look for an option called "Disable Permission Monitoring" in the Developer Options menu and enable it to resolve the issue. these steps are complete, your device is ready to receive ADB commands from your computer.
🖥️ Terminal Procedure for ADB Commands#
- Use Terminal from directory#
After successful setup and enabled USB debugging we are ready to use platform tools (downloaded in step 1.). We'll use Windows CMD to run the commands.
- Hold Left Shift on keyboard and press right click on the opened folder and click on Open command window.
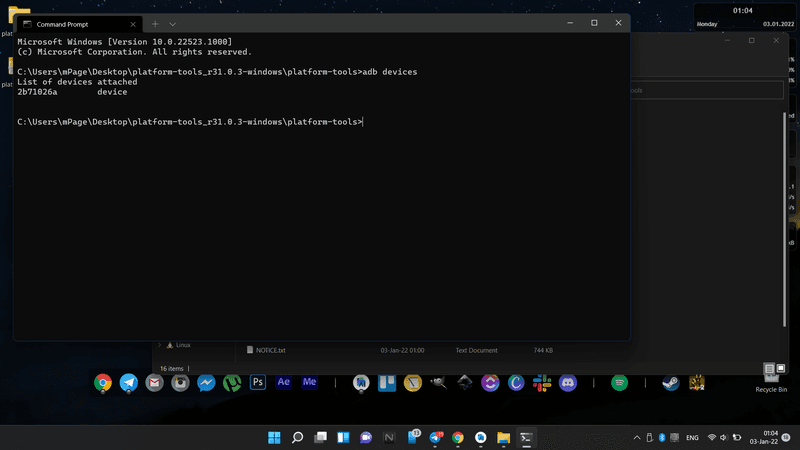
- After that run the command below and press enter
<span class="hljs-attribute"><span class="hljs-attribute">adb</span></span> devicesIf the device is shown in the terminal window as shown in the screenshot, you have successfully connected the device.
If for any reason your PC starts Power shell (just on Windows) instead of CMD, just follow the steps below
- Use terminal and change directory#
- Go to the Start menu, search for "CMD" or "Command Prompt," and run it as Administrator.
- Navigate to the folder where you extracted the platform-tools and copy its full path.
- In CMD, use the
cd(Change Directory) command to navigate to the platform-tools directory. Paste the full path aftercdand press Enter. The command should look like this:
<span class="hljs-built_in">cd</span> C:\path\to\platform-toolsThe cd command allows you to change the current working directory to the specified folder, enabling you to execute ADB commands.
🚧 Grant ADB permissions#
Execute the ADB command to grant specific permissions to your app. Replace PACKAGE_NAME with your app's package name and PERMISSION with the required permission, e.g.:
<span class="hljs-attribute">./<span class="hljs-attribute">adb</span></span> shell pm grant PACKAGE_NAME PERMISSIONThis guide specifically covers how to grant permissions for the Battery Guru app using ADB, use the following ADB command to grant the DUMP permission to Battery Guru
<span class="hljs-selector-tag"><span class="hljs-selector-tag">adb</span></span> <span class="hljs-selector-tag"><span class="hljs-selector-tag">shell</span></span> <span class="hljs-selector-tag"><span class="hljs-selector-tag">pm</span></span> <span class="hljs-selector-tag"><span class="hljs-selector-tag">grant</span></span> <span class="hljs-selector-tag"><span class="hljs-selector-tag">com</span></span><span class="hljs-selector-class"><span class="hljs-selector-class">.paget96</span></span><span class="hljs-selector-class"><span class="hljs-selector-class">.batteryguru</span></span> <span class="hljs-selector-tag"><span class="hljs-selector-tag">android</span></span><span class="hljs-selector-class"><span class="hljs-selector-class">.permission</span></span><span class="hljs-selector-class"><span class="hljs-selector-class">.DUMP</span></span>If the app requires other permissions, you can repeat the process for each permission by replacing android.permission.DUMP with the required permission.
🏆 Summary#
Granting permissions via ADB might seem a bit technical at first, but with the help of this guide, you'll quickly realize how straightforward the process can be. We've covered everything you need, from setting up platform tools and enabling USB debugging on your Android device to running commands in the terminal. Whether you're a beginner or just looking for a clear walkthrough, this guide provides detailed steps and practical examples, using Battery Guru as a case study.
Once you've prepared your PC, device, and tools, the process becomes easy to repeat. Simply connect your device, navigate to the appropriate directory in the terminal, and execute the necessary commands. The flexibility of ADB means you can use the same steps for any app by simply adjusting the package name and permissions.
After following this guide a few times, you'll get the hang of it, and what initially felt complex will become second nature. The entire setup and command execution can be completed in just a few minutes.
Good luck, and enjoy optimizing your Android experience with confidence! 😊