
A new research paper from Microsoft focuses on combining the strengths of ChatGPT and visual foundation models, such as Stable Diffusion, in order to create an architecture known as "Visual ChatGPT". This architecture aims to close the gap between text-to-image and natural language generation.
Visual ChatGPT offers a range of benefits, including the ability to generate images from user input text, remove or replace objects in photos, explain what is in a photo, make images look like paintings, and perform edge, line, and hed detection, as well as segmentation.
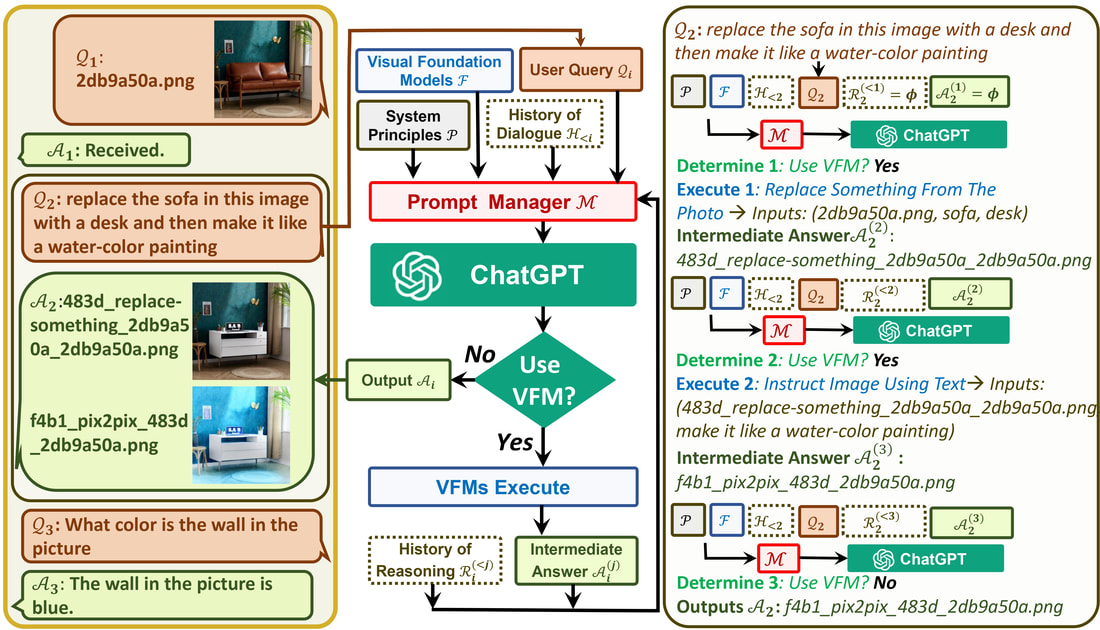
To achieve these benefits, Visual ChatGPT integrates various Visual Foundation Models with ChatGPT. These models are advanced algorithms for image editing. By using these visual foundation models, ChatGPT can handle user requests for generating and editing images. It not only understands user instructions (search query), but also has a feedback loop that modifies and improves output based on feedback. The architecture of Visual ChatGPT can be found on the official Microsoft Visual ChatGPT Github repository.
To achieve these benefits, Visual ChatGPT integrates various Visual Foundation Models with ChatGPT. These models are advanced algorithms for image editing. By using these visual foundation models, ChatGPT can handle user requests for generating and editing images. It not only understands user instructions (search query), but also has a feedback loop that modifies and improves output based on feedback. The architecture of Visual ChatGPT can be found on the official Microsoft Visual ChatGPT Github repository.
To run Visual ChatGPT, follow these steps:
Step 1: Create an environment with Python 3.8.
Step 2: Clone the GitHub repository of Visual ChatGPT and create a copy of it on Google Colab using the git clone command.
Step 3: Set the working directory to the copy of the GitHub repository.
Step 4: Install the required packages using the pip install command and the requirement.txt file.
Step 5: Download the visualisation foundation models using the download.sh script.
Step 6: Enter the OpenAI API key obtained after signing up for an account on the OpenAI platform.
Step 7: Create a folder for images.
Step 8: Start Visual ChatGPT using the visual_chatgpt.py file.
Since this is a memory-intensive task that requires high computation and GPU, it is recommended to use Google Colab, which provides free access to GPU resources and version control for projects. The commands for each step are provided in the here
Author
-Anurag
 RSS Feed